Saturday, August 27, 2011

Pinterest Pinning Party at Nest. Nesting.Nested.

Because so many of us {heart} Pinterest, I thought it would be a lot of fun to start a Pinterest Pinning Party here at Nest. Nesting. Nested. every Sunday. Anyone and Everyone with a Pinterest Account can link up!


Simply put YOUR Pinterest Pin Board Permalink into the linky and show us what you have been pinning.


I cannot wait to be inspired by all of your pins, start filling my nearly empty pin boards, and find new boards to follow!


Feel free to grab a Pinterest Pinning Party Button to help spread the word. Happy Pinning!


Nest Nesting Nested


Thursday, August 25, 2011

my new $50 countertop


With the help of my sweet brother, my new butcher block counter top is cut to size and installed.

I knew that I wanted butcher block on my island area, but as I started to research custom butcher block counter tops, I found them to be pricier (about the same as you'd pay for granite) than I thought they were worth. If you want butcher block, Ikea is definitely the place to go! My piece of "Lagan" solid birch butcher block was only $39 at Ikea. Can you believe it? I was so excited!
After getting it home and taking it out of the box, I realized that I was going to stain it. On a scrap piece of the butcher block, I tested out a few different colors. The stain went on super blotchy.

I then realized that I was going to have to pre-treat the wood with Minwax Wood Conditioner. It worked magic!
After using the wood conditioner, I tested out three other colors on another piece of scrap wood. The stain went on a lot smoother with the help of the wood conditioner. Because I didn't want the color of the butcher block to interfere with my wall color I went with a medium-light Minwax stain color called "Puritan Pine."

After the butcher block was installed, stained, and sealed, I realized that it was lacking some detail, so I did what I always do...added mouldings.


I found a "stain grade" moulding at Home Depot that worked perfectly. After the mouldings were cut and nailed in place, I stained it to match the butcher block. It matches perfectly! It is always amazing what you can do with a few dollars of mouldings and some creative thinking.


Please click on the links on my "Favorite Places to Link" page to check out the linky parties that I have joined.

Thanks for reading!!!


Thursday, August 18, 2011

going green...


Here is a glimpse of how my island is turning out.


It is now painted a soft green with a mocha glaze. There are just a few more little details that need to be finished before I show you all the entire space. I cannot wait!


The paint color is "Garden Shed" by Martha Stewart


Tuesday, August 16, 2011

another little peek into my kitchen

Originally I was going to paint all of the lower cabinets in my kitchen a different color than the upper cabinets, but because I really want my island area to stand out I decided to paint all the cabinets, excluding the island, in my kitchen the same creamy white. The island...well, that color is yet to be decided.

Here are a few pictures of my newly painted lower cabinets. Beadborad and mouldings were added to just two cabinet doors, I am trying to achieve a "created over time" look.


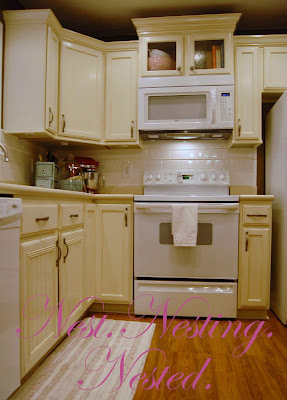
Here is a picture of what my kitchen looked like just a few short days ago


If you'd like to how to achieve the look of my painted and glazed cabinets, here is step-by-step instructions:

Supplies used:
*TSP
*sandpaper
*electric sander
*beadboard
*decorative mouldings
*liquid nails
*finish nails
*primer
*Martha Stewart "Heavy Cream" paint
*Paint brushes and paint roller
* Wipe-on Poly *Valspar glaze in "Mocha"


I first thought long and hard about how I would accomplish a more custom and updated looking cabinet. I came up with a plan that included beadboard, mouldings, paint, glaze and new hardware.


Now to really get started...


First you'll need to prepare your cabinet's surface by cleaning it with TSP and sanding it thoroughly. I used an electric sander to make the job easier and quicker, but you could always sand it by hand too.


Next I measured and cut two pieces of beadbord and then glued it, using liquid nails, to the recessed part of my cabinet doors. Finally, I finished it off by framing the beadboard with a decorative a moulding.
Now it's time to prime. I used two coats of primer and then waited until the next day to apply the paint. I used two coats of paint as well. 24 hrs. later, when the paint was completely dry, I sanded the cabinet just a little bit to smooth out any rough spots or drips.


You're almost done now...the glaze is so easy to apply. All you need to do is either wipe or brush a coat of glaze on, wait a minute or two and wipe some, most, or all of it off depending on how worn you want it to look.
The directions on the back of the glaze say to wait one week after glazing to apply a clear protective coat. I used a wipe-on polyurethane.


I am so happy with the end result...a beautiful, updated cabinet for very little money!


Please click on the links on my "Favorite Places to Link" page to check out the linky parties that I have joined.


Thanks for reading!!!


Sunday, August 14, 2011

and the winner of the vintage lace lampshade is....

Thank you to all that entered this month's giveaway and for all the sweet comments!
I wish you all could win!!!


True Random Number Generator

Min: 1
Max: 25
Result:
15
Powered by RANDOM.ORG


Comment #15

jennie_elisa_greene said...
I am a very faithful follower. I love everything you do. You have so many creative ideas. Thanks for sharing your ideas with all of us!!
August 9, 2011 12:55 PM


Congratulations!

Please email me with your information so I can ship this to you soon.

Thank you!

Tuesday, August 9, 2011

Progress in my kitchen

Here are a few pictures of what is going on in my kitchen....


Here it is again, now covered with smooth MDF and mouldings of course! Now time to paint...what color though?

Monday, August 8, 2011

Vintage Lace Lampshade & Lamp Giveaway

Today marks the official 6 month anniversary of Nest. Nesting. Nested. To celebrate, I am giving away a sweet little white lamp with a vintage lace lampshade that I made just for you. This lamp would be perfect in almost any space...in your laundry room, a bathroom, on a desk, in your kitchen, a bedroom, etc.


To Enter My Giveaway:
1 entry for simply leaving a comment letting me know what your favorite Nest.Nesting.Nested. project has been thus far


2 entries for being a follower


3 entries for all those following Nest.Nesting.Nested. prior to this post


Additional entry for:
~blogging about this giveaway or sharing it on facebook~


Please make sure to leave separate comments for each entry, up to 4 entries per person.
The winner will be randomly selected Sunday August 14, 2011.
Good Luck!!!

Thursday, August 4, 2011

6 months...

It has almost been six months since I started Nest. Nesting. Nested. I can hardly believe it!!! Monday August 8, 2011 will mark the official six month mark. Be sure to check back Monday, I am going to have a fun giveaway and will have a few fun projects (I am finally finishing my lower kitchen cabinets...exciting!) to share with you all.


Tuesday, August 2, 2011

A little sneak peek...

First, I want to thank all of you for all the sweet comments on my last post. I have read and reread them all....seriously Thank You!!!!


Remember all of those frames...

I painted all the frames white and have begun to work on a gallery wall in a little hallway in my home. This is a project that I thought would come together quick and easy, but really it hasn't. Every time I walk by the frames, I have ideas of what to change, what to add, etc. I first added chair rail and then painted the walls a darker color. I have started to hang the empty white frames, now just need to find the perfect pictures and things to fill them with. Hoping it is done soon!

Here is a little sneak peek...


(sorry about the poor picture quality, my camera battery was about to die)