I really love the way my tile turned out on both my laundry room and bathroom floors. I thought I would share with you all step-by-step instructions on how to tile, so that you too can tile your bathroom, laundry room, entry, etc.
Step 1: Measure room
Multiply the length of your room by the width of your room to find the total square footage.
Step 2: Remove baseboards
Start at one end of your baseboard and slide a putty knife between the wall and the baseboard pulling a gap between the molding and the wall just enough to get a pry bar behind the molding.
As you're pulling the baseboard away from the wall with the putty knife slide the straight end of the pry bar behind the molding until it touches the floor.
Pull the pry bar towards you. The end of the pry bar will touch the bottom plate of the wall and as you pull you won't damage the wall.
Remove the pry bar and insert if further down the molding and repeat steps three and four until the entire piece of molding is removed from the wall.
Be careful not to damage your baseboards, that way you can reuse them if you'd like.
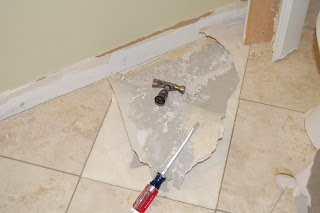
Step 3: Remove toilet
Turn the water off at the supply lines. Flush the toilet a few times to remove water from the bowl and tank. Use a sponge to remove any remaining water from the tank and the bowl.
Disconnect the water supply lines.
Remove the caps at the base of the toilet. Use a utility knife to cut the caulk at the base of the bowl for easy removal.
Lift off the bowl.
Scrap off all the old wax.
Step 4: Cut Cement Board
Use those measurements to cut the cement board to size. This material is hard, but not too difficult to cut through. Use a razor knife to score one side, then turn the board over to finish the cut. Use caution when cutting to avoid pulling the mesh off the board.
***Tiling over concrete eliminates the step of laying a cement board and saves quite a bit of time vs tiling over wood. The most difficult part of tiling over concrete is making sure the concrete is clean and level. If there was previous flooring, such as linoleum, remove it and scrape off all glue with a floor scraper.
Clean the floor with an abrasive cleaner. Check to make sure the floor is level. Minor problems can be corrected with the thin set mortar. If there is a major problem with the levelness of the floor, you need to put down a floor leveler. You can buy this at any home improvement store. Let the floor dry well before moving on to the next step.***
Step 5: Lay Out Pieces
Once all the pieces of cement board are cut, lay them out on the floor to make sure it's a tight fit.
Step 6: Secure Cement Board
Secure the cement board to the floor using a drill with screwdriver attachment. Use special cement-board screws, and place them every 6 to 8 inches.
Step 7: Mark the Center of the Room
Measure to find the center of the room. Mark it by snapping two chalk lines that intersect at the room's center point.
Step 8: Lay Out Tile
The tiles that I used come in sheets that are 1 ft. by 1ft. The individual tiles are attached on the underside with rubber "dots." The dots serve two purposes: they hold the tiles together in the patterned sheets and also act as spacers to create even grout lines. The rubber dots are easy to cut through when it's necessary to separate tiles.
Lay out the tile using as many full sheets as possible

Step 9: Spread Adhesive
Work in small sections, lifting out the tiles and spreading the adhesive. Spread the adhesive smoothly and evenly with a trowel. You'll want the adhesive to be about as thick as the tiles you're working with.
Lay the center section first, then you can tackle the tricky cuts around the edges of the room. Spread as much adhesive as possible before it dries. To determine how quickly the adhesive dries, check the open time on the product container.
Step 10: Set Sheet of Tiles in Place Set the first sheet of tiles into place and press it firmly into the adhesive. For the second sheet, remember to line up the pattern and check the spacing and then set it into place.
Step 11: Start in the Center of the Floor
Work around the room until the entire center of the floor is covered.

Step 12: Cover Perimeter of the Room For the perimeter of the room, trim full sheets to fit. To cut a tile sheet, flip it over and use a utility knife to cut the rubber dots, then pop out the piece. I started at the door and worked our way around, measuring and cutting tiles and sheets as necessary to fill the area.
Step 13: Cut Tile
The easiest way to cut individual tiles is with a wet saw. It uses water to keep the blade from getting too hot as it makes the cuts. Set the length wanted and guide the tile through the blade. You can rent a wet saw, or if you have just a few cuts to be made you can take it into Home Depot or Lowe's and they will cut it for you as long as you purchased it there.
Step 14: Grout
When mixing grout make sure it is creamy and easy to spread. Use "sanded"grout for larger spacing, "unsanded" grout for closer laid tiles. I used "unsanded" grout for this project.
Using a grout float, place a glob of grout on the tile and push it around the openings. Let it set for about 20 minutes then wipe the tiles with a damp sponge. Once the grout has hardened, buff the tile with a dry cloth.
Step 15: Seal grout
There are so many types of grout sealers. Some are a liquid that gets sponged on, and some are a spray. I used one that I sponged on. Make sure to seal the grout well to prevent staining. Your new tile floor will look new for a long time to come.
Step 16: Replace baseboards
If you are going to reuse your original baseboards you won't measure and cut new ones, simply replace them using a hammer and finish nails or a finish nail gun.
Step 17: Reinstall Toilet
First, purchase a new wax ring. If there is any question about the seal you need, take the old seal with you and the name of the toilet manufacturer so you can get the perfect match.
Make sure the seal is room temperature or warmer before refitting the bowl. Lift the bowl back over the nuts into position. Rotate the bowl back and forth several times to set the seal. Line the bowl up with the wall and check to make sure the bowl is level.
Replace the nuts at the bottom of the bowl and fill the caps with plumbers putty to keep water out.
Tighten the wing nuts and reconnect the water supply lines. Turn the water on and flush the toilet several times to check for any leaks.
Re-caulk the base of the bowl to create a water proof seal which protects your new tile floor.
 Good Luck, Enjoy, and Have a Good Weekend!!!

 These numbered hooks are from Hobby Lobby.
 A little stool, an absolute necessity! I wanted to make sure that they would be able to reach their toys and such without climbing like monkeys and getting hurt.
 I built the top shelf to store all of their books. The books are out of their reach and I kinda like it this way so that they can't rip and tear all the pages out of their books, which they like to do from time to time. The navy blue basket is full of their favorite books, perfect to pull down for reading time.
  How cute is that alphabet boarder? I saw it, loved it, bought it, and had no place to put it. It doesn't match their room, but it sure looks cute in their closet.
 This is such a boys space with their little bug collection and all!
 There is something about old blue jars that I absolutely adore.

 I also built these three shelves to hold these cute baskets that I bought at Michael's...don't they look PBK like?
 All of these containers/cloth baskets, both in the picture above and the picture below, are from Target. The shelves and shoe organizer in the picture below were also purchased at Target. This little area holds a lot of their things, shoes, more books, socks, under shirts, and more shoes.
 I seriously love how cute and functional this closet is. I have been able to put so much in such a little space by taking advantage of almost every square inch.


 You're almost done now...the glaze is so easy to apply. All you need to do is either wipe or brush a coat of glaze on, wait a minute or two and wipe some, most, or all of it off depending on how worn you want it to look. The directions on the back of the glaze say to wait one week after glazing to apply a clear protective coat (polyurethane). That is the point I am at, just waiting a couple more days to put the final protective coat on.


